Please note, I have moved all the pattern files to Ravelry. You will need to be a member to download them. Membership is free.

3/20/08

A Challenge

I am a member of a Yahoo bead knitting group. I challenged the group to knit my Embellish Me pattern and I would post pics of their bags here.
Emiko Sato is the first one to finish her bag. She embellished with beaded loop fringe and a beaded flower.


If you would like to join this challenge, please knit up the bag then email a picture of it (450 by 600 pixels in jpg format) to me at thebeadknitterATyahooDOTcom and I'll post it on here. Include your name and your blog/web site address if you have one.

2/29/08

Yarn Deli Poncho

This is a pattern I designed for my shop to encourage the purchase of novelty yarns. At the time Ponchos were extremely popular because Martha Stewart wore one the day she got out of prison.

Most of my customers used 5 different novelty yarns and a regular smooth yarn, but the model in the picture used 18 different yarns of various thicknesses and textures. This is a great pattern for using up leftover bits in the stash. Use your imagination and have fun with this pattern.


Knit by Ardell Parkin

I'm trying something new. I've acquired a place to host PDF files. From now on all the patterns on this site will be PDF downloads. You will need Adobe Reader to use the files. If you don't have Adobe Reader, it's free and you can download it from the link in the side bar. For the poncho pattern, the link is below:


2/6/08

In Honor of My Birthday

I'm gonna share this pattern because this is my birthday week.

There's a reason why I created this design. Upon learning how to do bead knitting I was drawn into needle bead weaving because I could make such cool straps for my bead knitted amulet bags. Well, my daughter was intrigued with my beading. Especially when I started learning the Peyote stitch. In fact, she has become quite an accomplished beader since then.

During one of our conversations we talked about making a pendant that would be sort of like a banner with a dragon on it, in the medieval kind of way. (Both my daughters are very into dragons.) Daughter's birthday was coming up so I thought I'd try my hand at creating something like that in Peyote as a gift for her. After several days of weaving and un-weaving and swearing and cursing-due to what was my lack of knowledge in Peyote stitch techniques, I finally shouted at the Fates "I could knit this faster!" Thus, an idea was born (and husband was startled out of his wits). Four hours later, I'd made this.


These are the instructions for making the pendant. You get to come up with your own idea for the strap, only because the instructions for this strap were on a web site that no longer exists. I hope you enjoy making it.

Dragon Banner Necklace

A knit beaded pendant


Finished Size:
Approximately 1½ inches wide by 3½ inches long.

Materials: 1 ball of size 8 pearl cotton, 1 hank (28 grams) of size 11 seed beads, a gold dragon charm 2½ inches long, one necklace the length of your choice that will fit through a half inch casing. Beads for fringe (Model used size 11 seed beads in main color(mc) and bronze, 15 size-3 bugle beads, and 15 4-mm accent beads), beading thread.

Tools: Size 0000 needles, tapestry needle, beading needle.

Gauge: Not important.

Abbreviations: K = Knit, K2tog = knit 2 together, sl1b = insert needle into next stitch, slip 1 bead up to the needle so it will lie between the stitches, st(s) = stitch(es)

Note: In the model, a pinch of bronze beads was added to the main color beads before stringing onto the pearl cotton.

String or transfer 3 yards of beads onto the pearl cotton.

Begin casing:
Cast on 16 sts.

Right side facing you-- Row 1: Knit all sts.

Wrong side facing you-- Row 2: K1, sl1b. Repeat across ending with K1.

Repeat rows 1 and 2 until piece measures 1½ inches from cast on edge.

Begin body:

Next Row: K1, sl1b. Repeat across ending with K1.

Repeat this row until piece measures 3 inches from beginning, ending with a wrong side row facing you.

Decrease as follows:

Row 1: K2tog. *sl1b, K1. Repeat from * across.

Row 2: K1, sl1b. Repeat across ending with K1.

Repeat these two rows until there is one stitch left.

Bind off.

Fringe:

Using 2 yards of beading thread on beading needle, anchor the thread to one lower corner of the banner. String 1 bronze seed bead, 5 mc, 1 bronze, 5 mc, 1 bugle, 7 mc, 1 4mm, 3 mc onto thread. Thread needle back through beads starting with the 4mm. Knot to bottom of banner, thread the needle through edge over to next stitch and repeat from * across until there are 15 fringes evenly across the bottom. Knot off the beading thread and weave in the ends.

Finishing: Fold the casing in half with wrong sides together. With the tapestry needle and a strand of pearl cotton, sew cast-on edge of casing to wrong side of banner just above the beaded section. Sew charm to center front just below the top. Thread a chord or necklace of your choice through the casing.

Copyright © 2005 Linda Jo Park. All rights reserved.

1/24/08

The Duggles Hat


The Duggles Hat

Here is an easy hat that doubles as a scarf. Originally I created this pattern for my shop (which I no longer have). Teens like the look of this hat. My husband, Doug, loves his, thus the 'Duggles' hat.


Materials: Worsted weight yarn—7 oz. main color (MC), 3 oz. each of 2 contrasting colors (A and B).
(Model made using Plymouth Encore)

Pattern: Stripes- *4 rows MC, 4 rows color A, 4 rows color B, 4 rows MC, 4 rows color B, 4 rows color A. Repeat from *.

Tools: Size 8 knitting needles, yarn needle.

Gauge: 4.5 sts = 1 inch

Finished size: Approximately 22-23 inches around, 60 inches long.

With MC, cast on 6 stitches. Knit in stockinet stitch (knit one row, purl one row) following stripe pattern for 6 rows.

Next row: Increase 1 stitch on each side.

Continue in stockinet stitch stripe pattern, increasing 1 stitch each side every 6th row 42 more times (92 stitches). Knit even in pattern until 47 inches long from beginning.

With MC, knit in 1 by 1 rib (knit 1 stitch, purl 1 stitch) for 20 inches. Bind off in rib.

To make up: Block. With right sides together, sew center back seam. Gather stitches at top of hat and secure. Fold edge of ribbing to inside and sew to first row of ribbing. Put a pompon or tassel on the end.

You can knit this in a solid color, or in a fairisle pattern too.


Copyright 2005 Linda Jo Park. All rights reserved.

10/20/07

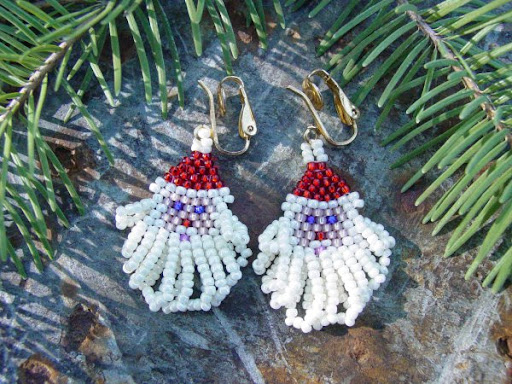
Santa Earrings in Brick Stitch

Santa Earrings in Brick Stitch
by Linda Jo Park

I was asked to teach a class on making little brick stitch Santa earrings. So I created this pattern. I offer it here for your enjoyment.


Materials:
Size 11 seed beads or Delicas.
Beading needle size 11
Nymo thread in size B or D

Earring wires


Add 10-bead loop fringe to side beads as indicated in diagram.

Add loop fringe to each bottom bead to make beard:

8 beads in 1st loop
12 beads in 2nd loop
16 beads in 3rd loop
20 beads in 4th through 6th loops
16 beads in 7th loop
12 beads in 8th loop
8 beads in 9th loop

Add loop of 3 beads, 1 earring wire, then 3 beads to top of hat.


Copyright 2007 Linda Jo Park. All rights reserved.